Uair has a ridiculous little thing that it does during the autocancel window where it pulls your feet (the bottom of your ECB) up then drops them within the first few frames. This can be used to quickly put yourself into 4-frame landing while not quite all the way up through a platform, shaving a ton of frames off of getting Zelda’s slow, hulking mass up onto a platform. Anytime you could waveland onto a platform while coming up through it (with a few exceptions) you can also uair ac ai and be grounded and actionable within a few frames. This really improves our platform game, for example taking platform then quickly dashing back can solidify your position and dodge a punish while possibly creating an opening of your own. This is a critical piece of platform movement that I’ve been employing to great effect. It can be used to quickly setup a dsmash or a techchase from a grab below a platform.
Sunday, July 16, 2017
Wednesday, April 5, 2017
BOOK I - Drop Dash
BOOK I - DROP DASH
The dropdash is a device of my own creation; its purpose is a faster, wigglier wavedash on platform. Dropdashing is performed by dropping through platform, jumping the first frame actionable through platform, and wavelanding the frame after. This negates Zelda's monstrous jumpsquat time during wavedash startup and saves you one frame, bringing her WD on platform down to 6 frames. If performed optimally the dropdash is slightly longer than WD as you can gain slight horizontal distance and momentum by jumping forward/backward.
I find the easiest input for this to be down -> roll into WD angle, then input the equivalent of a jump cancel grab except using R instead of Z. The most important part of the dropdash input is the DJ to digital trigger press being within a one frame window. If you shield early with analog during the time it takes you to pass through platform, you will shield and not pass. To combat this and to give me more versatility in trigger inputs, I remove the spring from my right trigger and take it off of the analog rail. This allows for a pure digital-only trigger button for more precise cases of trigger input. Dropdashing has a one frame tolerance; you can perform a dropdash on frame 1 or 2 after passing through platform.
This technique really shines out of shield drop. Giving you the equivalent of a frame 4 wavedash on platform, this is extremely difficult to execute but very possible to master with enough practice. Practice shield drop doublejump and wait for your opportunity to waveland, then over time slowly tighten the window between your shield drop and doublejump to get up to speed and have a muscle feel for the stick movement needed to go from shield drop position to wavedash angle quickly. This technique really enables some insane speed and is becoming a major movement option for me. This cannot be understated in its importance to Zelda's ability to move and control area.
Monday, April 3, 2017
BOOK I - Farore's Wind - Interactions and Bending The Rules
BOOK I - FARORE'S WIND
Interactions and Bending The Rules
Farore's has a couple of interaction rules that are important to know and important to know how to bend.
1. An aerial teleport passing downwards through a platform will always put Zelda into a grounded teleport on that platform and interrupt the teleport.
How to bend it: land your Farore's startup. Aerial teleports can be converted to grounded teleports if Zelda lands on a platform during the Farore's startup, this allows for teleport movement through the platform.
You can also ground a teleport by drifting Farore's upward through a platform. This can be useful to drift yourself into a cancel spot and give your opponent less time to read your options.
This is especially useful on Yoshi's as grounding a drift Farore's near the edge of side platform during startup and sweetspotting downwards to edge is extremely difficult to expect or even follow when expected.
2. Farore's from below the ledge does not sweet spot. If you complete your startup animation and are below the ledge, there is no way for you to not have vulnerable frames before grabbing ledge.
How to bend it: Farore's startup will always cancel and magnet grab ledge if it is moving downwards within range of and facing an available ledge. This is very useful to recover flat towards edge as you will magnet from a wide angle. This also makes Farore's grab ledge during IASA frames, out of tumbles, and from less intuitive angles. You can also use this to Farore's stall on ledge.
3. Horizontal Farore's into ledge also does not sweetspot. You will teleport stall on the stage until the point which you reappear, and you will be vulnerable for a couple frames until you begin falling downwards.
How to bend it: A teleport directly into stage at a particular height (right around where you would be hitting Zelda's knees into stage) will actually push you up onto stage thanks to weird ECB shape during the transition to special fall. This shaves some frames off of special fall and allows you to recover flat around a hogged edge from a longer distance.
BOOK I - Farore's Wind - Farore's Stall and Other Farore's Ledge Movement
BOOK I - FARORE'S WIND
Farore's Stall and Other Farore's Ledge Movement
Farore's stalling is something beyond useful that begins the march towards Zelda's insanely sticky ledge presence. If done perfectly you can be completely invuln on ledge indefinitely while throwing hitboxes.
Maintaining invulnerability is dependent on releasing ledge on the first possible frame, and not fastfalling more than a couple of frames. Releasing ledge late is what I find most often putting me into a vulnerable state during a stall, and is the only point this move requires frame-tight precision. This will be a difficult movement to master, experiment with different inputs and see what works for you. I strongly recommend using Uncle Punch's Training Pack to train your ledge release and invulnerability.
Maintaining invulnerability is dependent on releasing ledge on the first possible frame, and not fastfalling more than a couple of frames. Releasing ledge late is what I find most often putting me into a vulnerable state during a stall, and is the only point this move requires frame-tight precision. This will be a difficult movement to master, experiment with different inputs and see what works for you. I strongly recommend using Uncle Punch's Training Pack to train your ledge release and invulnerability.
Another useful use of ledge position is ledgehop Farore's. This is valuable as you can adjust the starting height of Farore's stall without losing invuln, and ledgehop Farore's visually appears to be a stall until you crest ledge, land, and teleport across stage. It's a great way to regain stage control when being pressured on ledge from a medium distance.
Many of these options can be combined for maximum flashitude. For example, Battlefield has a ledgehop Farore's edge cancel on top platform. You can drift teleport away from ledge while stalling to throw a farther out hitbox and still magnet ledge. Be creative; the best way to use these techniques is all of the ways.
BOOK I - Farore's Wind - Edge Cancels
BOOK I - FARORE'S WIND
Edge Cancels
Edge cancelling Farore's makes the move into an extremely fast and powerful gap closing and chase tool but the tolerance to land edge cancels is extremely small due to Zelda's higher traction. Despite the high precision required, the payoff is immense as landing it can lead to more followups, safer recoveries, and better positioning. Horizontal teleport cancelling is by far the easiest, as it's possible on platform to another platform and you only need concern yourself with your X position on the platform. You can get a feel for this distance by standing directly between the red arrows in the center of Pokemon Stadium's platforms and teleporting across to the other platform. This is the easiest visual platform cancel queue Zelda has. I recommend learning to cancel by feel rather than spot memory as you will have overall more reliable teleports in more places when you use distance judgment to hit your cancels.
Aerial cancels are harder but are possible along a line of points while aerial rather than a single point like on platforms. Zelda needs to fall onto edge at the end of her teleport for a cancel. These have multiple angles and points and can be achieved most easily with horizontal teleport. There are a multitude of teleport spots on every map but some are far from intuitive.
Generally teleport edge cancels are not possible from above due to Farore's propensity to become grounded upon passing downwards onto a platform, but longer than maximum teleport distance downward edge cancels are possible given you finish your teleport invisibility before coming to the platform. This enables some serious trickery as recovering from a great distance offstage suddenly becomes an actionable state immediately off of the edge of a platform but this is by far the most difficult edge cancel in my experience, it requires almost pixel perfect judgment over a very wide distance.
Stage / ground teleport cancels are also possible and enable a wide-range option on stages like FD + Pokemon. This is simplest performed by starting farore's on the first frame of jump as if wavedashing (hover teleport). This has a very narrow window to execute successfully and like other aerial teleport cancels is possible along a line above stage achievable by increasing the time between jump + teleport start & distance between you and the edge.
BOOK I - Farore's Wind - Teleport Drift, Hover Teleports, and Applications
BOOK I - FARORE'S WIND
Teleport Drift, Hover Teleport, and Applications
Teleport drifting is something very weird and very useful that most Zeldas have seen as a phenomenon but have not found consistency in it. Farore's maintains some of Zelda's momentum and is most apparent during doublejump. DJ back or forward followed by an immediate Farore's carries Zelda's teleport startup in the direction of the DJ at a reduced speed. This enables you to take evasive action and start a teleport to somewhere safer or quickly adjust your Farore's position to make a sweetspot possible. Teleport drift also happens during fastfall and you can start a fastfall followed immediately by farore's to drop your teleport faster than usual.
Teleport drift is also affected by momentum prior to teleport outside of DJ. If you begin a Farore's immediately out of hitstun while still moving from an attack, your Farore's will drift with your momentum. This stacks with DJ drift and can be used to move a considerable distance away from your initial location preventing combos and giving you quick options to ledge where you are very strong.
A low/flat recovery is possible in certain situations by double jumping slightly below the ledge and drift teleporting into ledge grab range. This is one of the safest possible recoveries as the length of Farore's magnet grab makes it more difficult to stuff recovery and edgehogging this is marginally effective as Farore's snaps to the ledge as soon as it is unoccupied but has options for many frames to avoid death in the event of a longer edgehog.
Since teleport drift is affected by momentum, it obviously is also affected by a lack of momentum. If you're holding a DJ you can perform a drift stop teleport by jumping straight up with the control stick in neutral / up into immediate farore's. Stop teleports are useful to sweetspot Farore's as stopping drift allows you to more reliably hit an aimed-for point be it on a legde or a platform for an edge cancel. Drift stop teleports are still affected by prior momentum from attacks after hitstun but seem to ignore momentum from wavelands / shield push / etc. Drift stop teleports are sometimes inconvenient, like when you're trying to fastfall drift before your doublejump you will often DJ a frame or two before Farore's and perform a normal drift or drift stop. If you input up-B within a frame such that there is never a naked control stick up input you will be able to fastfall drift even with a DJ.
Grounded Drift teleports are possible by teleporting after jumpsquat similar to WD. I refer to these as hover teleports. You can also DJ immediately after jumpsquat for a bigger DJ drift teleport. This is considered an aerial teleport and is best used on flat ground to Farore's edge cancel, which will be covered soon. A Farore's from ground at any angle horizontal and below is considered grounded the entire time and cannot be edge cancelled in my testing as it seems zelda comes out of teleport with exactly 0 horizontal momentum.
Zelda does NOT drift (slide) during grounded Farore's. If you begin a Farore's on the ground, it seems to set your X momentum to 0. This makes a sliding cancel like Sheik's teleport edge cancel impossible, but the same idea can still be applied to quickly grab ledge and throw out a hitbox. If you hover teleport while running to the ledge, you can start a farore's as soon as jumpsquat ends either by a jump or by sliding off the edge drift teleporting. The teleport should drift far enough if you're near ledge that you can sweetspot it easily with SE / SSE inputs but you can get pretty tight with it. You can also use your Farore's while sliding to stop yourself on the spot; this is especially useful during amsah teching as it gives you an unexpected way to burn momentum and regian stage presence without you needing to grab ledge.
Zelda's drift teleport usually is used with a DJ, but it's also possible to fastfall drift with farore's while holding a DJ. You need to either tilt into utilt range for upB, or buffer the up input during some other aerial or uninterruptable action so you do not DJ. One super cool and flashy application of this is waveland off ledge to no-jump drift tp. It throws a hitbox and grabs ledge very shortly afterwards. You can do this with either method; I find it easiest to buffer up while wavelanding.
BOOK I - Farore's Wind - Sweetspotting
BOOK I - FARORE'S WIND
Sweetspotting
With those things said, a low recovery is always a less favorable situation than a high recovery. A Farore's angle under horizontal traveling towards the edge will interrupt its invuln invis teleport with a ledgegrab. This ends invuln gained from farore's and begins normal ledge invuln from which you have multiple stall options if needed.
Farore's can sweetspot when travelling downwards at any angle under horizontal towards ledge. Sweet spotting the teleport seems to require the stick to be in a neutral position when passing the ledge to sweetspot similar to sheik's tp sweetspot. Your directional input is read as soon as you become invis/invuln on frame 33 and as far as I can tell becomes locked afterwardns. Using the vanish as a visual cue to learn the aim / release timing most reliable way to sweetspot in my findings. You should be aiming to eventually execute this with raw timing alone; your opponent's action directly before TP should dictate the direction you will move in, and staring at yourself watching for when to release the stick will limit your options.
Sweet spotting is also possible straight down, vaguely reminiscent of bowser / yoshi bombs. You must already be facing edge to do so; you cannot up B turnaround straight down Farore's. The same rules apply, release the stick to netural to grab ledge on your way down. You'll develop a feel for your range when teleporting with practice. This is extremely useful near enough to edges that you can drift a teleport from above stage to above ledge and break combos / gain position, but that is all for another book.
BOOK I - Farore's Wind - UpB Turnaround
BOOK I - FARORE'S WIND
Up-B Turnaround
Another bad situation for inexperienced Zeldas to find themselves in is facing away from ledge directly below ledge. A straight up Farore's is death due to facing the wrong way, and any other direction buries you in the stage or the abyss. However, it is possible to B turnaround Farore's during the aiming window with extremely light control stick movement towards stage; between 5-15% of a full input towards stage. The amount required is what would put the stick out of dead zone, but not quite into tilt territory If you teleport into stage and die, you tilted too far.
I've used controllers where the control stick was loose enough that I could Farore's turnaround just by bringing the stick to it's outer range of neutral stick wiggle. This is a phenomenal tool for edgeguarding low and close as you have a safe way back to stage that most players are not aware of.
The light blue bars in this stick chart indicate where a Farore's turnaround is possible.
BOOK I - Farore's Wind - Multi-directionality, Angles, and Shortens
BOOK I - FARORE'S WIND
Multi-directionality, Angles, and Shortens
It doesn't really seem it, but Farore's is actually a full-angle directional teleport. This allows for fringe cases of teleport that the majority of players won't expect.
Recovering from under ledge closer to stage for novice Zeldas is usually a raw death trap, either teleport straight up and die due to the total lack of control over SpecialFall after teleport, or they teleport up and in and get an extra helping of stage to the face. Farore's angles can save lives. All in-game angles are available as directions for Farore's teleports and teleport shortens. North, South, East, West, and then intermediate angles that are not within 17.1° on the 360° stick of NSEW. I will refer to compass directions instead of angle directions for simplicity's sake. When you're low and near on the left side of the stage in a spot where compass directions N and NE would lead to death, NNE is usually available and is surprisingly forgiving compared to its nearby brothers. It moves Zelda almost parallel to the bottom of her ECB and has the tendency to allow for more movement around edges / walls due to more reliably retained vertical momentum and Zelda's ECB shape.
NNE is also useful where you are being ledgehogged out of your NE ledge grab but prefer not to serve them your N teleport with hot fudge and a cherry on top. This lets you take some stage space and gives you landing/passing options if platforms are available. Watching and anticipating enemy action on the end of your teleport is crucial for a successful low recovery. V cancelling during special fall out of teleport can maintain higher % damage levels and drift teleporting after being hit can nab you ledge quickly without you opponent having recourse, but I will be covering these more in depth as part of Farore's Book II entry.
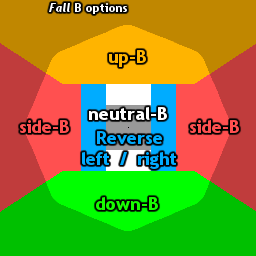
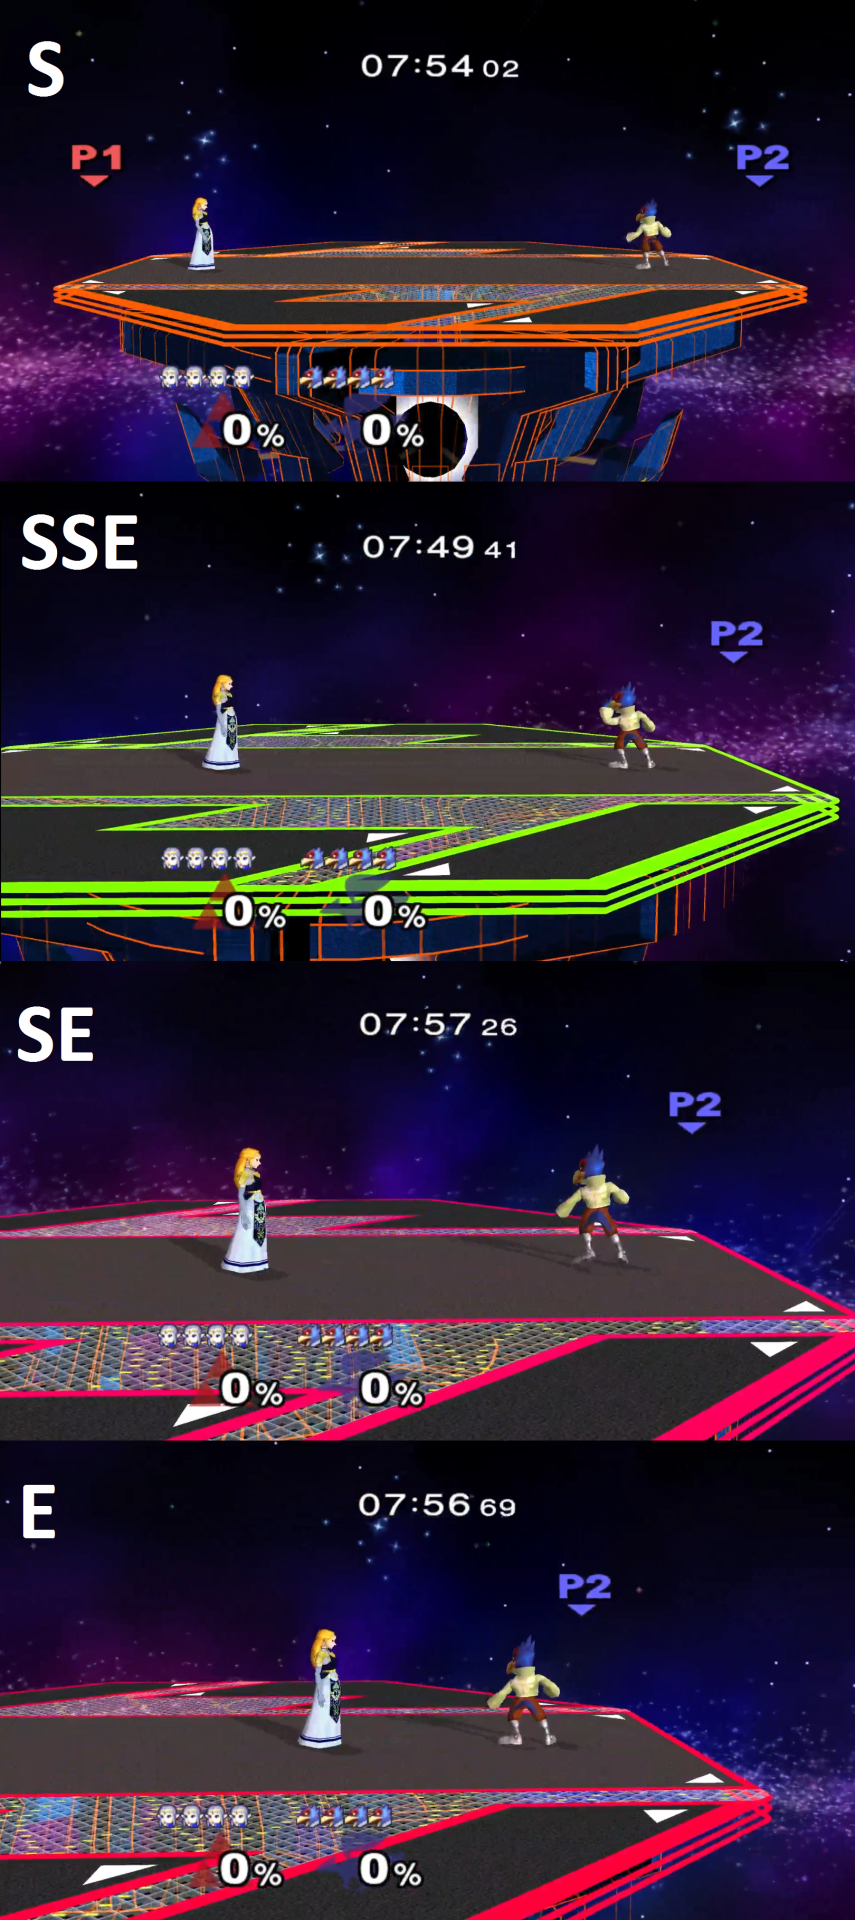
Another case of multi-directionality in Farore’s is her grounded teleport shorten. When playing everyone’s favorite “where the fuck will Zelda teleport” game, it behooves you to have an additional option apart from across the universe or exactly where you are already. Aiming S will face Zelda to the right without moving her any other way, regardless of the direction she started facing. Aiming SSE and SSW during grounded teleport shortens the teleport to around 1/3 of the distance of a regular grounded teleport and can be used in cases where a full lateral teleport isn’t possible or as a mixup to the teleport shuffle you’re already running them around the stage with. Aiming SE takes you about 2/3 of the way there, and aiming ESE/E takes you the maximum distance. Intermediate angles shorten intermediately as expected.
Subscribe to:
Posts (Atom)